IPv6 setup arduino / esp8266 -part 4#
In my previous section, I covered the setup of my home server and applications.
This section covers the setup of my IOT (Internet Of Things) devices and sensors for IPv6.
research#
I started with checking the internet to see what options were available. A common program used in this area is TASMOTA and I use this on several of my devices too.
This doesn't offer IPv6 as a downloadable image, but there was the suggestion that you can compile your own version of the program. (Not so easy.)
The comments ask why do you need it?. Well, there are some users who can now only get an IPv6 network from their ISPs.
I use a number of ESP8266, ESP01, ESP32, Wemos D1, and SONOFF devices for various purposes so this was the focus of my efforts. These platforms have been around for several years and therefore the focus when they were released was not so much towards supporting IPv6.
Additionally, memory is a key constraint for these small devices, so to support dual stack IPv4/IPv6 would use up limited resources.
Arduino IDE#
I mostly use this for compiling my programs but have recently looked at platformio.
With the Arduino IDE there is an option available on the Tools menu for most boards to compile the program with IPv6 support.
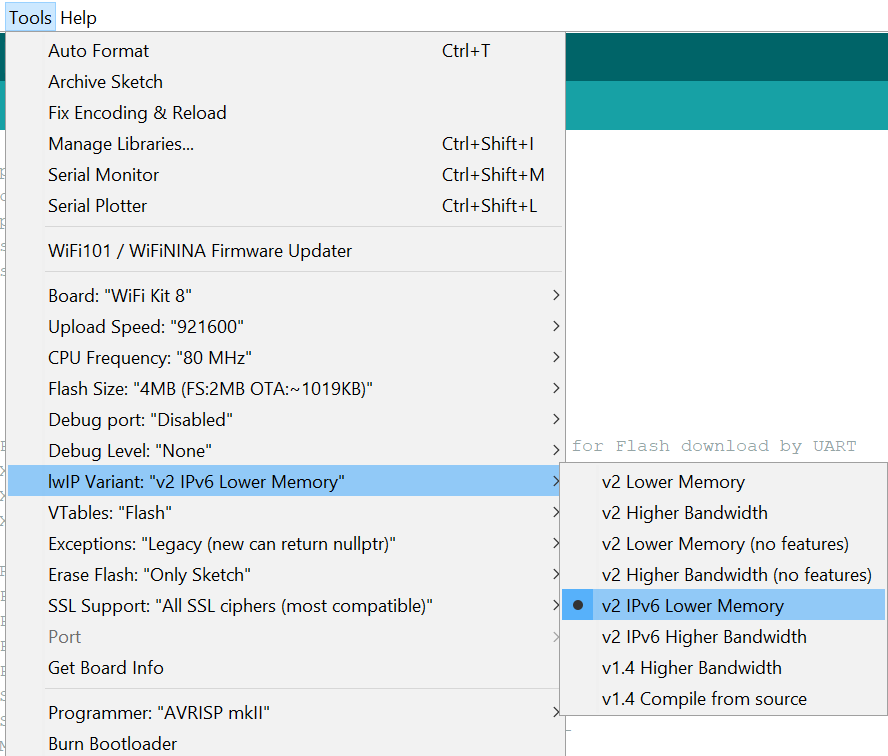
I am using v1.8.9 and am not sure when this feature became available to the IDE.
Issues encountered#
Whilst the program compiled with IPv6 support and I could work with IPv6 addresses, I encountered an issue with DNS. By default the device will use a dual stack and get both an IPv4 and IPv6 address. With this is was able to access the DNS server available with an IPv4 address.
Issue: DNS not available for IPv6 only network.
This was an interesting issue to get to the bottom of.
I could see in a network trace that the ESP8266 made a DHCPv6 request for an IP address and received one.
I also saw it made a `DHCPv6 option' request for a DNS server.
The USG did not respond to the DHCPv6 option request.
My Ipad worked fine, so how did it get it's DNS server IP for the network?
A network trace showed the Ipad made an ICMPV6 RS (Router Solicitation -133) multicast broadcast. It then received a RA (Router Announcement) from the router which included the Network Prefix and size, DNS Server and DNS search list. It setup it's own IPv6 address using the Network Prefix and it's Mac address and then checked this with the router for validity.
Manually setting the DNS server in the Arduino IDE#
Issue: How do I set an IPv6 address correctly for the
dns_setserverfunction.
(This took some time to work out.)
I used the following instruction in the definition section to include the DNS server library.
LWIP_IPV6 is a variable setup by the IDE when you select the tools option shown above.
    #ifdef LWIP_IPV6
         #include <lwip/dns.h>
    #endif
Then in the setup section, I included the setting of the DNSserver, then the waiting loop for the IPv6 routable address.
IPv6 first assigns a local address for the device and then receives or sets up the routed address once the network negotiation is complete.
#if LWIP_IPV6

  // Manually set DNS-Server ipv6 address
  ip_addr_t ip6_dns;

  // GOOGLE EXTERNAL - 2001:4860:4860::8888
  IP_ADDR6(&ip6_dns,PP_HTONL(0x20014860UL), PP_HTONL(0x48600000UL), PP_HTONL(0x00000000UL), PP_HTONL(0x00008888UL));

  dns_setserver(0, &ip6_dns);
  delay(100);

  // wait for global ipv6 address
  for (bool configured = false; !configured;) {
        for (auto addr : addrList)

          if ( !addr.isLocal() && addr.isV6() ) {
            configured = true;
            break;
          }
        Serial.print('.');
        delay(500);
      }
#else
  // wait for ipv4 address
  if (WiFi.waitForConnectResult() != WL_CONNECTED) {
      Serial.println(F("Connection Failed!"));
      timeout_cb();
    }
#endif
Stocktake - sensors#
My sensors are working with IPv6.
For now this is all I have to say on IPv6. It has been an enlightening journey and I am pleased to be able to accomplish the goal I set out at the start.